Allen-Bradley
Documents >> Driver Document >>
Allen-Bradley
The Allen-Bradley driver can communicate with Allen-Bradley control devices such as Micro800, Control Logix and others.

General Settings
. Host/IP: Insert the Route Path of the controller
. Enable: Activates or deactivates the Driver Document
- True: The document will be always activated
- Condition: Activates the document whenever the condition is fulfilled
- False: The document will never activate
. Timeout:
Allen-Bradley
. Model: Choose PLC model between Control Logix, Micro800, PLC5, SLC500 and MicroLogix.
Read
. Trigger: If checked, will read all the inputs every time a configured tag changes its value. Select the desired tag to use as a Trigger in the TextBox beside it.
. Refresh Time(ms): If checked, will read all the inputs every specified time, in milliseconds.
Write
. Trigger: If checked, will write all the inputs every time a configured tag changes its value. Select the desired tag to use as a Trigger in the TextBox beside it.
. Tag Changed: If checked, will write an input every time its linked tag (of the Tag List) changes.
Tag List
When opening a Driver Document, it will display Driver options in the Ribbon where it is possible to create and delete Driver Items.
A Driver Item is what links a Tag from SmartView to an Input or Output of a Controller.
Once a new Driver Item is inserted, the user will have four fields to configure:

. Tag: Write the Tag name that is going to be associated with the specific address.
. Address: Enter the memory address of the item that will communicate with the tag.
. Tag Type: Choose the type of PLC tag that will make the communication. The options are BOOL, SINT, INT, DINT, REAL, STRING, LINT, USINT, UINT, UDINT, ULINT, LREAL, DWORD.
. Quantity: The quantity of members, if it is more than "1" then it is an array.
Example:
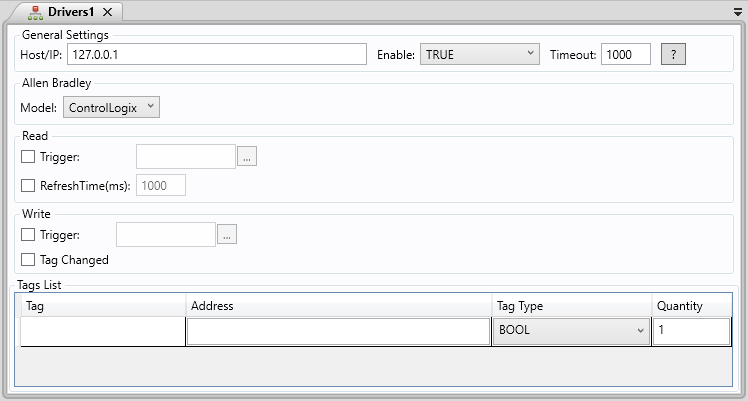
We configure the simulation of communication with SmartView and Allen Bradley Control Logix.
01. Create newtag1, integer in the Tags Document.
02. Create Allen-Bradley folder in Driver.
03. Create Driver1 document inside Allen-Bradley folder.
04. Select Control Logix in Model.
05. Chech RefreshTime(ms) in Read.
06. Chech Tag Changed in Write.
07. Write newtag1 on Tag cell.
08. Write myTAG on Address cell.
09. Choose Int in Tag Type.
10. Set "1" in Quantity Field.
11. Run the application.
Here is an example of a configured ControlLogix/CompactLogix PLC:

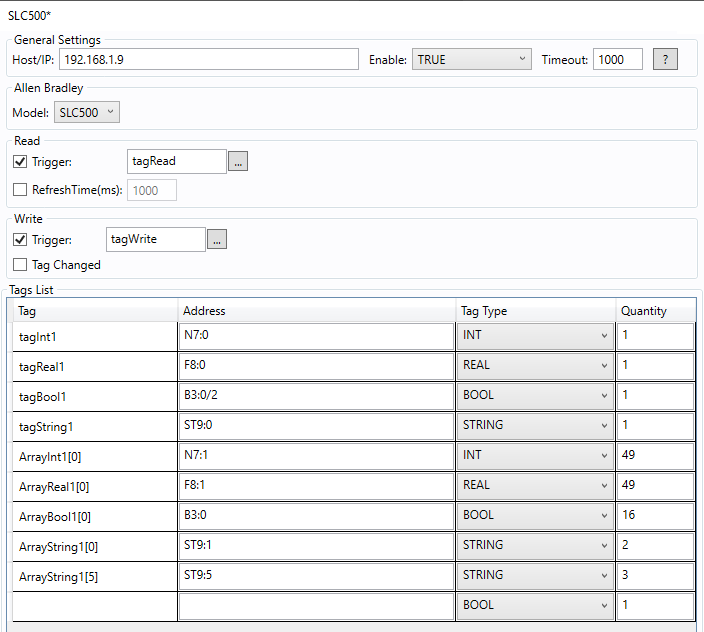
Here is an example of a configured SLC500/PLC5 PLC:

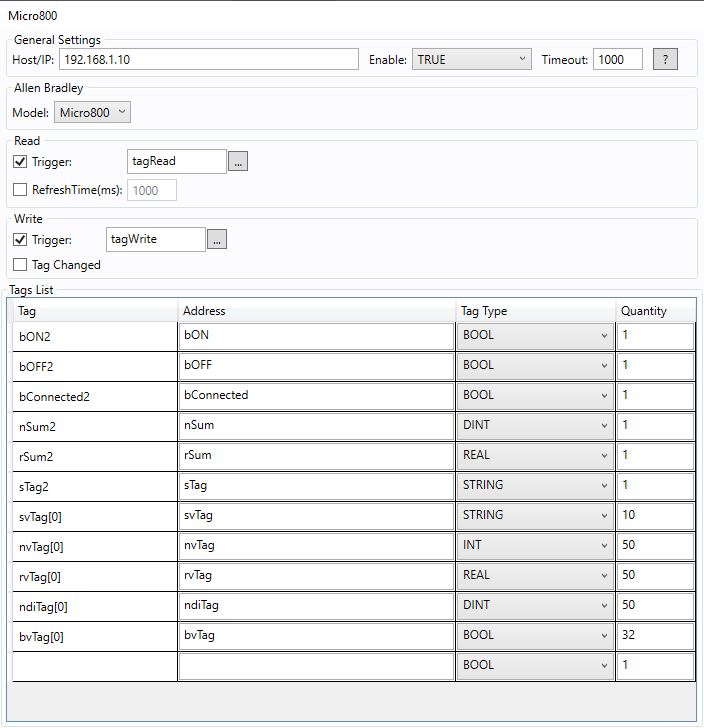
Here is an example of a configured Micro800 PLC:

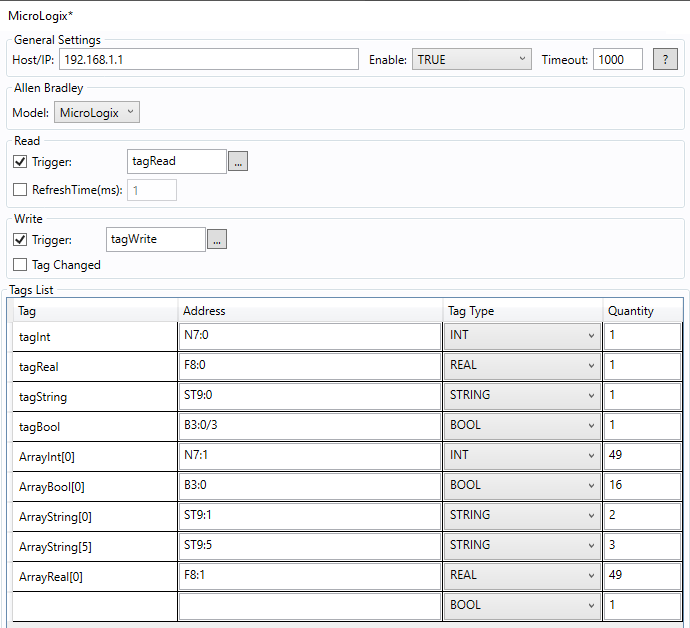
Here is an example of a configured MicroLogix PLC:

|
|
|
Note: the following models has some limitations concerning array size and string length The models micro1100/SLC500 has a limit of: an array of type string can't be more than 2 members (Quantity), an array of type bool can't be more than 16 members (Quantity). The models micro1100/SLC500/micro800 has a limit of: type string can't be more than 80 characters (length). The model control logix has a limit of: type string can't be more than 84 characters (length), an array of type bool can't be more than 32 members (Quantity). |