Screen Tags
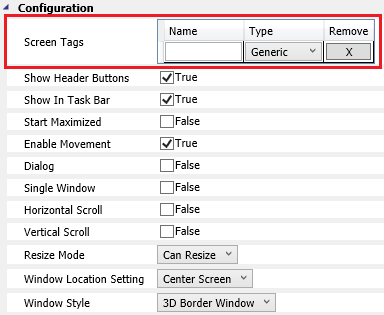
A Screen Tag is a variable which links a Tag between Graphics, acting as a dynamic Tag, which vary its value depending on what calls it. It must be called, while calling the new Graphic.
It can only be configured from the Properties Window of the Graphic.

To configure a Screen Tag, follow the steps below:
1. In Properties Window, click the ScreenTag Name field.
2. Insert the desired name of the Screen Tag.
3. Select the desired type of the Screen Tag.
4. Repeat steps 2 and 3 until the desired Screen Tag(s) are created.
Using a Screen Tag:
To use a Screen Tag, it must be called using "#" prefix. For example, if you want to use a Screen Tag named val, it must be written as: #val.
It is usually used when it is necessary to open a Graphic in which information changes depending of the object you clicked.
Example:
A screen is created which will show the name of two different buttons that call it.
1. Create two string Tags: Name1 and Name2.

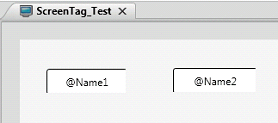
2. Create a Graphic document named ScreenTag_Test, and create two buttons within it.
3. Configure the Text property of both buttons. One with @Name1 and the other with @Name2. It should look like this:

4. Create a new Graphic named PopUp_ButtonName, and create a label within it.
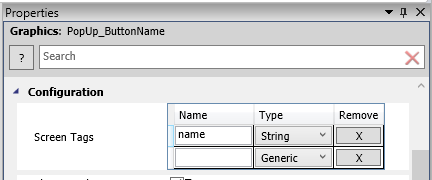
5. Create a Screen Tag. Go to the PopUp_ButtonName Properties Window -> Configuration -> ScreenTag. Next, create a Screen Tag named name and type String. This Tag is going to take the value from the tags @Name1 and @Name2, which are strings. To do that, fill the ScreenTag configuration to look like the picture below:

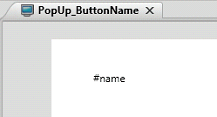
6. Now, configure the Text property of the label created in PopUp_ButtonName to show your new Screen Tag, just write #name in it.

7. Now, lets link the ScreenTag with the buttons from ScreenTag_Test. To do that, you need to use a dictionary to assign the Tag to the ScreenTag. Configure the MouseUp script of both buttons as written below:
. Button1:
System.Collections.Generic.Dictionary<string, string> dic = new System.Collections.Generic.Dictionary<string, string>();
string str = "Name1"; //Assign the name of the Tag as a string, without @.
dic.Add("name", str); //The first parameter is the name of the ScreenTag, the second is the string assigned with the Tag. This is the link between Tag and ScreenTag.
Window.OpenGraphic("PopUp_ButtonName", dic);
. Button2:
System.Collections.Generic.Dictionary<string, string> dic = new System.Collections.Generic.Dictionary<string, string>();
string str = "Name2";
dic.Add("name", str);
Window.OpenGraphic("PopUp_ButtonName", dic);
8. Before we run the application, let's give some values to @Name1 and @Name2. Go to the Startup service and write:
@Name1 = "Button A";
@Name2 = "Button B";
9. Run the application and try opening the PopUp Graphic with the buttons. You will see how the name will change when you open it with the other button.