History Configuration
There are two main fields to configure a History Document: Document Settings and History Items.
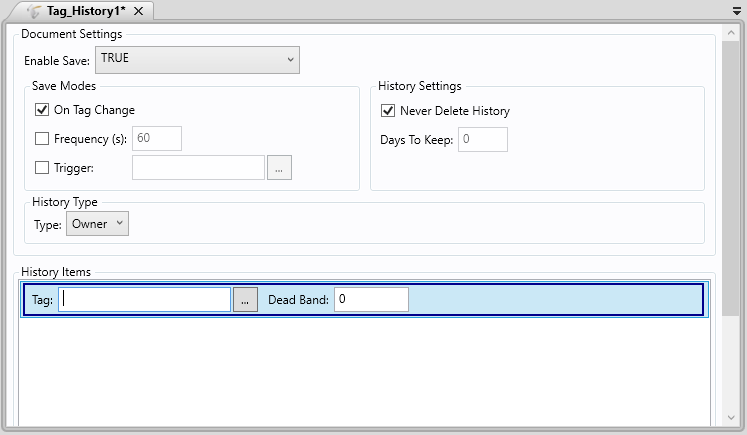
Document Settings:
Enable Save:
. TRUE: The history of the tag value will be enabled; for example, the history will be saved in the file.
. FALSE: The history of the tag value will be disabled; for example, the history will not be saved in the file.
. CONDITIONAL ENTRY: The history of the tag value will depend of the result of the expression configured. If the result is True, the history will be enabled and if the result is False, the history will be disabled.
Save Mode:
. On Tag Change: The Tags History will be saved every time a tag configured in the history items changes.
. Time Frequency: The Tags History will be saved at every time configured by the user.
. Frequency (s): Establish the frequency that the Tags History is going to be saved.
. Trigger: The Tags History will be saved every time the tag configured in the trigger field changes.
History Settings:
. Never Delete History: If checked, the Tags History file or table in a database created will never be deleted. It will disable Days To Keep TextBox.
. Days To Keep: Set the days the Tags History file or table in a database will last. If this field is set to 0 (zero) value, the history file will be kept until 11:59:59 PM of the current day.
This field will only be available if the field Never Delete History is unchecked.
History Type:
. Type: Configures where the Tags History is going to be saved.
Owner: The Tags History will be saved in a file in the fixed path (which is the project path\History).
DataBase: The Tags History will be saved in the selected Connection Item.
. Connection Item: Select one of the configured DataBase Connections:
History Items:
. Tag: Insert the tag which will have the History saved.
. DeadBand: This property configures a band where no action occurs. The value of the tag will be saved in the history only if its variation is higher than the value configured in this field. This field is shown for integer and float Tags.
Example 1: History with On Tag Change.
In this example, we are going to create an application which will save the values of a Tag every time it changes more than 5 points, and we will keep it for one week.
1. Create a new Integer Tag called @ChangingTag.
2. Create a new Graphic and call it Test and establish it as the Startup Graphic within the Graphic Settings Ribbon options.
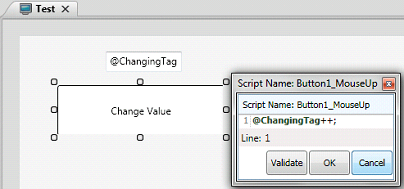
3. Create a Button. In its Properties Window, fill the field "Text" with "Change Value" and the MouseUp Script with the following script: @ChangingTag++;
4. Create a TextBox and fill its Text property with the name of our Tag, thus, controlling it.
It should look like this:
5. Create a new Tags History Document and insert one History Item.
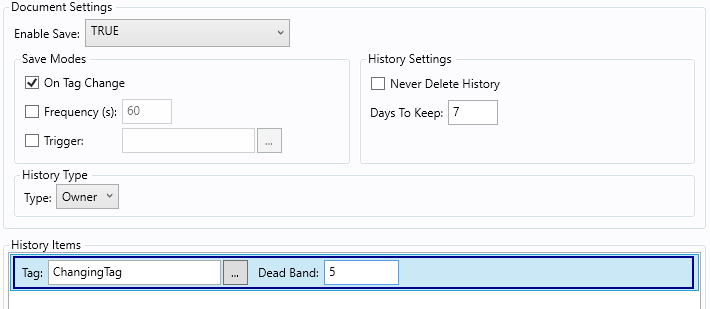
6. Set Enable Save to TRUE.
7. Fill the "Tag" field with the name of our Tag: @ChangingTag.
8. Uncheck "Never Delete History " and write 7 inside "Days To Keep" TextBox to keep the saved files during one week.
9. In Saving Modes, Check "On Tag Change"
10. Type "5" within the DeadBand TextBox.
The History Document, at the moment, should look like this:
11. Run the application.
Now, click the button to add one to our Tag. Each time our Tag changes more than 5 points (click the button 5 times), its value will be saved.
Example 2: History with Time Frequency.
In this example, we are going to create an application which will save the values of a Tag every minute, and we will keep it forever.
1. Create a new integer Tag called @FrequencyTag.
2. Create a new Graphic and call it Test and establish it as the Startup Graphic within the Settings Ribbon options.
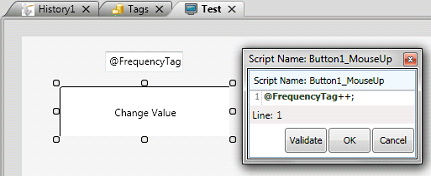
3. Create a Button. In its Properties Window, fill the field "Text" with "Change Value" and the MouseUp Script with the following script: @FrequencyTag++;
4. Create a TextBox and fill its Text property with the name of our Tag, thus, controlling it.
It should look like this:
5. Create a new Tags History Document and insert one History Item.
6. Set Enable Save to TRUE.
7. Fill the "Tag" field with the name of our Tag: @FrequencyTag.
8. Check "Never Delete History" .
9. In Save Modes, check only the "Frequency(s)" checkbox, and type "60" in the textbox next to it.
The History Document, at the moment, should look like this:
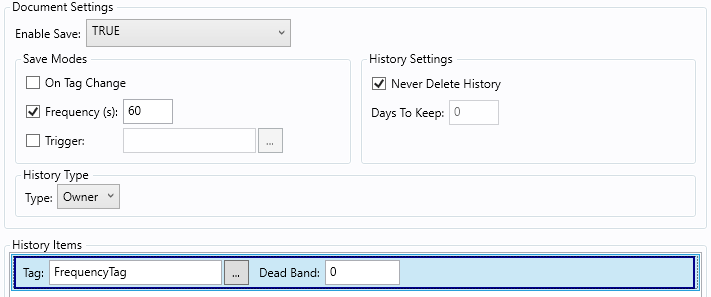
10. Run the application.
Now, @FrequencyTag's value is going to be saved every minute, and you will be able to change its value just by pushing the button.